Adjusting the balance bar
Because of the caliper piston size and balance, the front brakes require about twice as much fluid volume as the rear.
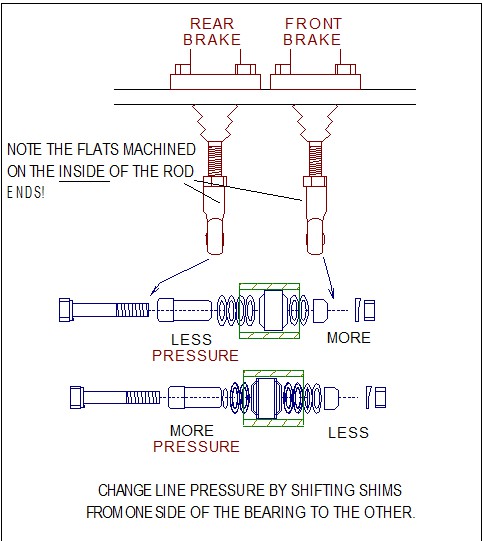
At rest, the outside link must be adjusted longer than the inside one - roughly plus 3/8". This is to allow as much fluid to the front brakes as possible before the balance bar bottoms out in the housing (in the reversed angle that is shown at the right).
Note that the early cars used a different configuration, with a pressed-in bearing and short spacers (no shims). The longer spacer was used on the front brake master side.
Modifying the brake balance
Generally, the stock setup will work with stock (recommended) pads. The brakes are not boosted, so you may be experiencing manual-brake culture shock. You need more leg in the ERA than your "real" car. Sometimes, that takes some time to aclimate to. Allow yourself a bit more following room for the first few miles. (And don't tailgait, period. It's neither courteous or safe.)
If you are using a non-standard pad or have an unusual setup, a change in configuration might be required. Changes might include:
- Shifting the shims in the balance bar. Moving a shim from the front master side to the rear master side will increase the pressure to the front. (It reduces the lever arm length to that side.)
- The smaller the master cylinder bore diameter, the more pressure to that end. i.e. If you reduce the front master cylinder bore, you increase the pressure (bias) to the front, and the inverse is true.
Flushing the system
The most compatible fluids are Castrol LMA and ATE type 400. Both are DOT 3 or 4. Don't use DOT 5 - it's silicone-based and may create problems with seals. You will need about a pint of fluid total.
Since the front and rear brakes are separate systems, it doesn't matter which you do first. While you can use a vacuum bleeder, it's not necessary.
I would do the flush this way:
-
Open the right front bleeder and pump the brake pedal (slowly) until
the
reservoir is almost dry. If you
run it completely dry, you
will be punished.

- Fill the reservoir and pump the pedal again, until you're getting new fluid from the right caliper. (Obviously) Don't ever let the reservoir go dry!
- Do the same process with the left front caliper.
- Repeat the sequence with the rear calipers, doing the right one first, then the left.
- The feed for the clutch is midway up the reservoir, so don't let the level fall below the feed hole when you flush the clutch. Have someone depress the clutch while you open the bleeder. Close the bleeder before they release the pedal. Repeat until the fluid is fresh.
VW master cylinders
Used up to chassis #175, these cylinders are cast iron rather than aluminum of the Tilton units.
(2) VW 113 611 021C
A short run used one of the above and one larger bore one for the front. The spacers on the balance bar must be adjusted it the front master is substituted.
VW 211 611 011J (Bus)
- Remove the internal circlip that retains the piston.
- Remove the piston, spring and spring seat.
Create a way to bypass the internal residual pressure valve by:
- If there is a rubber plug in the spring seat, remove it or punch a small hole in the center.
- If there is a spring-loaded cone in the bottom of the spring seat, drill a small hole slightly off-center
- Thoroughly clean all components.
- Reassembly the cylinder
Replacement calipers (2 piston) by Stainless Steel Brakes
Dragging
Brakes (VW)
Brake drag is usually a result of a blocked return port in the master cylinder. This can be caused by serveral things:
- Misadjusted pedal return stop. Fix: Back off the adjuster, allowing more clearance.
- Rust in the master cylinder bore: Fix: Rebuild or
replace the master cylinders. See above.
- Sticking balance bar - Fix: free up and lubricate