Updating to Tilton Master Cylinders
- 1 Tilton 74-875U (front, 7/8" bore) w/adapter cap and clamp
- 1 Tilton 74-750U (rear, 3/4" bore) w/adapter cap and clamp
- (master cylinders will have brake switches and adapters
- installed)
- 1 Weld-on brake cylinder bracket
- 1 Metal brake line, front 28 inches long
- 1 Metal brake line, rear 47 inches long
- 2 Remote reservoir fill lines, rubber, 31" long
- 4 5/16" USS x 1" Bolts, with flat & lock washers and nuts
- 1 3/8" USS x 1/2" bolt and lock washer (to replace pedal stop)

Procedure:
a) Remove the brake box. Remove original brake pedal stop from brake box and discard. Remove the front and rear metal brake lines from the car, the two rubber fill lines from the reservoir to the cylinders, and then the front and rear master cylinders and pushrods. These parts will not be reused. The brake lines must be replaced as the original metric fittings will not fit the new Tilton cylinders, and the brake stop is only needed with the VW cylinders, and will interfere with the Tilton units. Replace the pedal stop with the 3/8" bolt and washer provided.b) Carefully remove original brake bracket from chassis. Grind original welds flush as necessary, being sure not to weaken or damage the frame rail. Have this operation done by a professional if you are not skilled in this type of work.
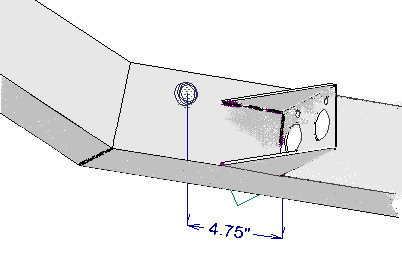 |
c) Weld the provided brake bracket to the chassis as shown at the left. The bracket should be MIG welded on all 3 outer sides of the bracket where they contact the chassis. It is essential that the bracket be located properly, and that the welds have good penetration. This is a critical chassis part, upon which the brake system depends. It must be installed by an experienced welder, using proper techniques and equipment. ERA will assume no liability for brake failure if the bracket and other parts of this kit are not installed properly. |
d) After attaching the bracket to the frame rail as directed and repainting the bracket and chassis on the affected areas, install the new brake lines provided in this kit. Note that the red fittings install into the master cylinders. Be sure the rubber bushings are properly located, and that the frame tabs hold the brake lines securely and without damage.
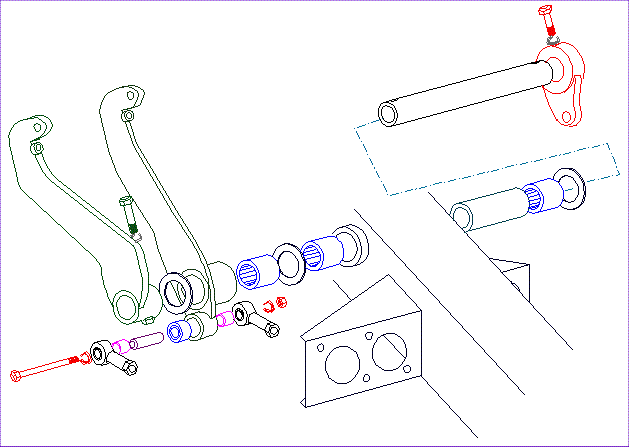
Note! Early cars use bronze bushings instead of the needle-bearing assemblies shown.
e) Loosely install the rear cylinder (3/4") on the inside of the bracket, closest to the frame rail.f) Carefully screw the rear brake line fitting into the cylinder. Don't cross-thread! Always start the threading by hand, going in at least 1 full turn. It may be necessary to bend the line slightly so that it enters the master cylinder at the proper angle. Tighten the bolts securing the cylinder, and then the fitting on the brake line.
g) Install the front cylinder (7/8") on the outside of the bracket, following the procedures outlined in step e & f.
h) Install the jam nuts and rod ends onto the new cylinders using the enclosed diagram as a guide, and reassemble the balance bar and brake pedal assembly.
i) Check all hardware and threaded fittings for proper tightness, but do not over-tighten. Bleed the front and rear brakes using Non-Silicone brake fluid. Dot 3 brake fluid is acceptable, Dot 4 is better. Be sure not to depress the master cylinder pushrod more than 1-1/8" to avoid damage to the internal seals in the unit. The unit may also be bench bled before installation, which will expedite the installation and bleeding process.
j) The rubber pedal stop on the front of the brake box is no longer needed. Replace the stop with the 3/8" x 1/2" USS bolt and lock washer.
If the pedal height is too high, the threaded links on the master cylinder may have to be adjusted.
Readjust the balance bar assembly, following the instructions here.
Wiring: If your original wiring only supports a single brake light switch, use the terminals #81 and #82A (the two parallel blades) on the front master cylinder switch. The other switch can be ignored. More details can be found here.