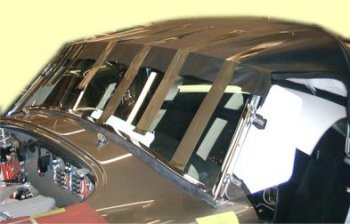
| To prevent scratches in the paint, tape heavy paper over the area of the rear body snap studs. Punch holes so the studs protrude through the paper. | Some detail pictures of a finished top here. | ||||
|
|
|||||
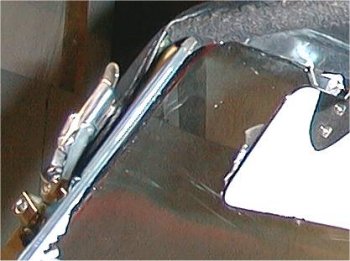
| Install the front
channels
onto the windshield
frame. The inside portion
of each front channel has a stud that fits into the slot of the frame.
See
below. Press down to engage, slide to the outside and down in the
windshield
frame. Check that the stud is secure in the windshield frame.
|
 |
||||
|
|||||
|
|
|||||
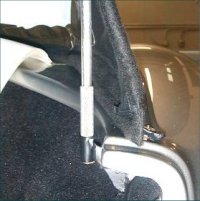
| Assemble the rear
bow halves
together. Turn the knurled
adjusters all the way into the ends of the bows.
Install a ferrule in each of the receptacles adjacent to the body just outside the seat-backs. Slide the bow assembly into the sockets with the hinged brace toward the rear.
|
|
||||
|
|
|||||
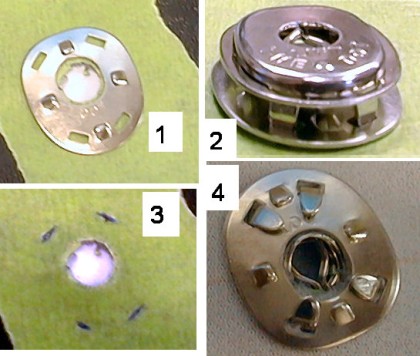
|
Install a snap on each rear flap as close as possible to the outside corner: Punch a center hole in the fabric. Use the snap backing plate as a guide to make 4 small slits in the fabric with a sharp knife. If you don't want to cut the holes directly, press the outside piece into the paper to make a mark. Then, accentuate the marks with a pen and cut the slots. (4) From the outside, insert the prongs through the small slits. Install the snap backing plate to the underside of the material, bending the prongs to secure the snap. |
 |
||||
|
Lay the top in place over the rear bow and secure the snaps to the studs in the body closest to each rear door opening. If the top is too tight for the snaps to reach the studs even at the lowest height adjustment, remove some material in the where the main bows come together to create some slack. If the frame doesn't follow the contour of the fabric, it can be "tweaked" to fit by hand/over-the-knee bending. Starting on the passenger side of the car, install the balance of the snaps in the center of the flap, alternating from each side towards the center. |
 |
||||
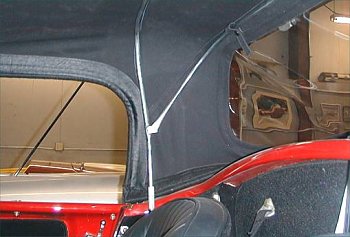
| If you have
a roll bar, slice the back panel below the
window to fit around the roll bar back leg. (The 289 FIA's
brace
goes forward, but the top of the roll bar hoop still requires a small
pocket.) The filler will be added later. 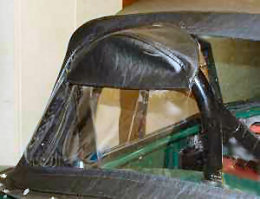 289FIA |
 |
||||

| Beginning at
the
center, carefully un-tape a portion of the top fabric
from the windshield. Glue a portion of the top fabric to the front
vertical
face of the channel with contact cement. Do not apply the glue to the
top
of the front bow, only to the front surface. Work from the center to
the
sides until the entire top surface is glued.
Remove both front bows and wrap the front of the fabric around inside the channel, leaving a couple of inches hanging at the sides. Trim the excess front fabric and glue the material into the inner surface. See above. If the car has a roll bar, carefully make a slit from the bottom edge of the top to about 1" into the plastic window. A small boot can be made from two pieces of fabric sewn together, sandwiching the top material between them. |
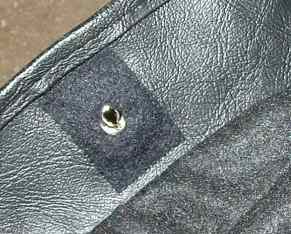 Glue
felt pads to the
underside of all snaps to prevent paint
damage.. Glue
felt pads to the
underside of all snaps to prevent paint
damage.. Use 2" masking tape to tape each front channel down to the top of the windshield securely at the outer edges. Pull the top fabric over the top of the channels, beginning at the center and working over to each side, taping the material to the windshield glass as you work.
Alternately adjust the top over the rear bows and pull and re-tape the top material at the front to remove slack from the top and minimize wrinkling. Do not pull hard at any time. Stress can break the windshield! Make sure the top material is centered on the front bows and windshield. Keep adjusting the fabric at the rear and front of car until the top is smooth and sag free. |
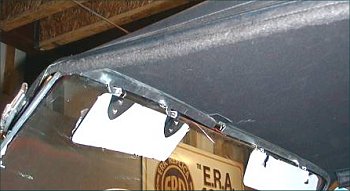
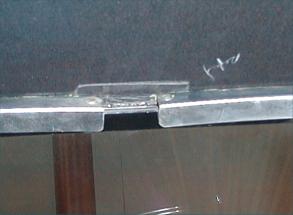
| With the
top fabric
installed, tape down the
edges
of the front bows securely.
Attach the latch "hooks" to the windshield frame using the hardware provided. See the diagram above. Determine where the latches must be installed on the front channel to provide proper tension on the front channel when installed with foam rubber between the channel and top frame. Mark the holes for the latches on the fabric of the front channel, then remove the channels from the car to drill the holes for the rivets. |
Rivet the latches to the front channel. Remove
the remainder
of the mandrel
from the rivets, and peen the backside of the rivet as flat as
possible.
Glue the extra flap of material on the top over the exposed rivets on the backside of the front channel. Glue 1/8" thick foam strips to the inside of the front bow channels to seal the top of the windshield frame. |
|
REMOVE
AND REPLACE
(after
fitting)
Cold temperatures make top installation difficult.
|